Let’s face it, accessing your Pi remotely for free is something every tech enthusiast dreams about. Whether you’re managing servers, running projects, or just tinkering with your Raspberry Pi, being able to control it from afar is a game-changer. But how exactly do you pull this off without breaking the bank? Stick around, because we’ve got all the answers you need.
Nowadays, the world of IoT (Internet of Things) is booming, and Raspberry Pi is leading the charge. These tiny computers are everywhere, powering everything from home automation systems to complex server setups. But what happens when you need to access your Pi while you're miles away? That’s where remote access comes in—and yes, you can do it for free.
Before we dive into the nitty-gritty, let’s clarify something: accessing your Pi remotely for free isn’t just about convenience; it’s about efficiency. Imagine being able to troubleshoot your home network, check on your security cameras, or even stream data—all without needing to physically touch your device. Sounds cool, right? Let’s get started.
Read also:Mcdoodle Stencil The Ultimate Guide To Transforming Your Artistic Projects
Why Access Pi Remotely Free Matters in 2023
In today’s fast-paced world, remote work, remote learning, and remote management are the norm. Accessing your Pi remotely for free isn’t just a luxury—it’s a necessity. Whether you’re a student, hobbyist, or professional developer, having remote access to your Pi can save you time, money, and headaches.
Here’s the thing: not everyone has the budget to invest in expensive cloud services or dedicated hardware. That’s why free remote access solutions are so valuable. They allow you to leverage the power of your Pi without the financial burden. Plus, with the right tools, you can achieve professional-grade results without spending a dime.
Tools You Need to Access Pi Remotely Free
Before you start setting up your Pi for remote access, you’ll need a few essential tools. Don’t worry; most of them are either free or already built into your Pi. Here’s what you’ll need:
- Raspberry Pi (duh!)
- An active internet connection (Wi-Fi or Ethernet)
- A static IP address or Dynamic DNS (DDNS) service
- SSH (Secure Shell) enabled on your Pi
- A VNC client (optional, if you prefer graphical access)
- A smartphone or computer to access your Pi remotely
These tools might sound intimidating, but trust me—they’re easier to set up than you think. We’ll walk you through each step in a moment.
Setting Up SSH for Free Remote Access
SSH (Secure Shell) is one of the most popular methods for accessing your Pi remotely. It’s secure, reliable, and—best of all—free. Here’s how you can set it up:
Step 1: Enable SSH on Your Pi
To enable SSH on your Raspberry Pi, follow these simple steps:
Read also:Kinokuniya Dr Grip Pen The Ultimate Writing Companion
- Boot up your Pi and open the terminal.
- Type
sudo raspi-configand hit Enter. - Use the arrow keys to navigate to "Interfacing Options" and press Enter.
- Select "SSH" and enable it.
- Reboot your Pi to apply the changes.
That’s it! SSH is now enabled on your Pi. Easy peasy, right?
Step 2: Find Your Pi’s IP Address
To connect to your Pi remotely, you’ll need its IP address. Here’s how to find it:
- Open the terminal on your Pi.
- Type
hostname -Iand hit Enter. - Take note of the IP address displayed (e.g., 192.168.1.100).
This IP address will be used to connect to your Pi from another device. Keep it handy!
Using Dynamic DNS for Remote Access
Now, here’s where things get interesting. If you want to access your Pi remotely from outside your home network, you’ll need a way to bypass the dynamic IP address assigned by your ISP. That’s where Dynamic DNS (DDNS) comes in.
DDNS services map your dynamic IP address to a static domain name, making it easier to connect to your Pi. There are several free DDNS providers available, such as No-IP, Dynu, and DuckDNS. Here’s how to set one up:
Step 1: Choose a DDNS Provider
Pick a free DDNS provider that suits your needs. Most of them offer easy-to-use interfaces and reliable services. For this guide, we’ll use DuckDNS.
Step 2: Create an Account
Sign up for a free account on DuckDNS and create a subdomain (e.g., mypi.duckdns.org). This subdomain will act as your Pi’s address on the internet.
Step 3: Configure Your Pi
To link your Pi to your DDNS subdomain, follow these steps:
- Download the DuckDNS client for Raspberry Pi from their website.
- Install the client on your Pi by running
sudo bash duckdns.sh. - Follow the on-screen instructions to complete the setup.
Once configured, your Pi will automatically update its IP address with DuckDNS whenever it changes. Pretty neat, huh?
Securing Your Remote Access
Security is a top priority when accessing your Pi remotely. After all, you don’t want unauthorized users gaining access to your device. Here are a few tips to keep your Pi safe:
- Use strong passwords for your Pi’s user accounts.
- Disable password-based authentication and switch to SSH keys.
- Change the default SSH port (22) to a custom port number.
- Install a firewall to block unwanted traffic.
By following these best practices, you can ensure that your Pi remains secure even when accessed remotely.
Alternative Methods for Remote Access
SSH isn’t the only way to access your Pi remotely. Depending on your needs, you might prefer one of these alternative methods:
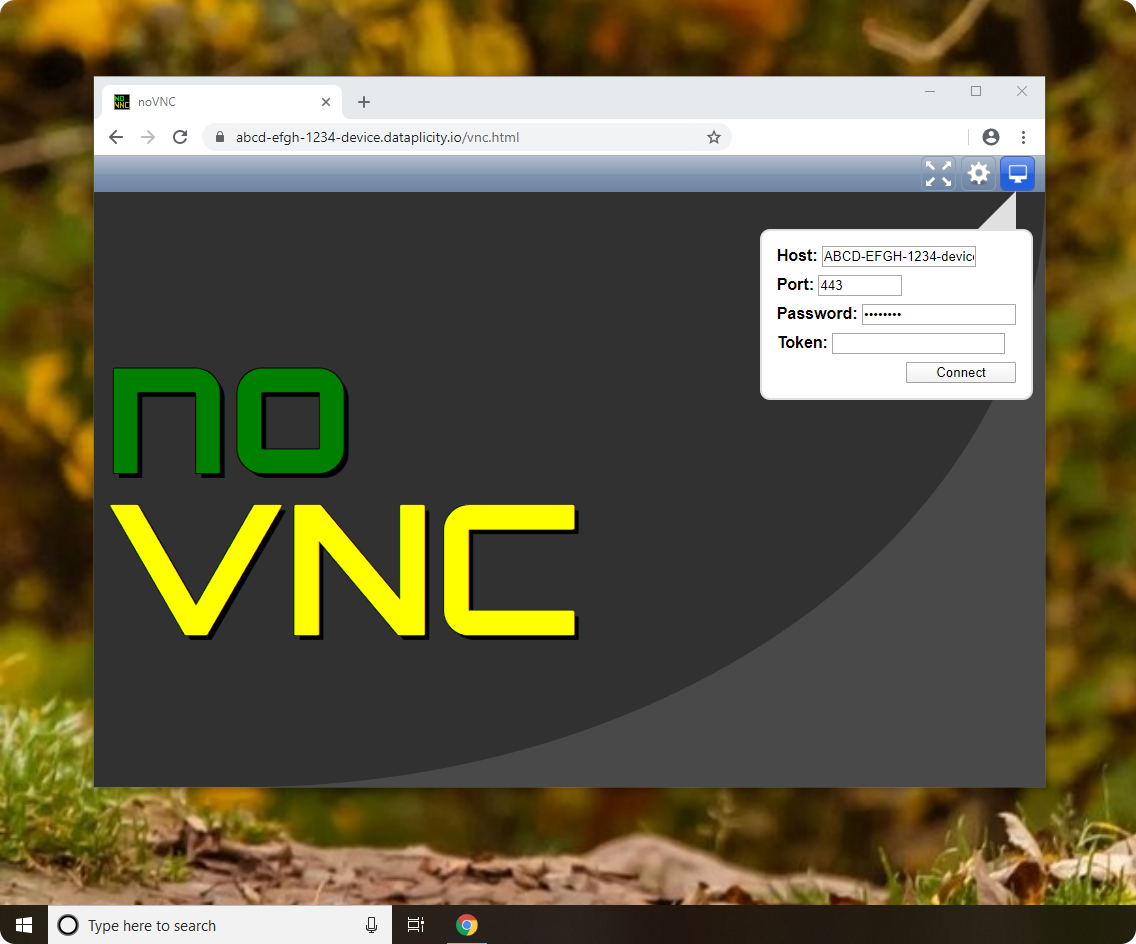
VNC (Virtual Network Computing)
VNC allows you to access your Pi’s graphical interface remotely. It’s perfect for tasks that require a GUI, such as editing files or running applications. To set up VNC:
- Enable VNC on your Pi via the Raspberry Pi Configuration tool.
- Install a VNC client on your remote device (e.g., RealVNC Viewer).
- Connect to your Pi using its IP address or DDNS subdomain.
Web-Based Interfaces
Another option is to create a web-based interface for your Pi. This allows you to access your device through a browser, eliminating the need for additional software. Tools like Node-RED and PiWeb make this process incredibly easy.
Troubleshooting Common Issues
Even with the best setup, things can go wrong. Here are some common issues you might encounter and how to fix them:
- Connection Refused: Ensure SSH is enabled and your firewall allows incoming connections on the SSH port.
- IP Address Not Found: Double-check your Pi’s IP address and make sure your DDNS service is working correctly.
- Authentication Failed: Verify your login credentials and ensure SSH keys are properly configured.
If you’re still stuck, don’t hesitate to consult the official Raspberry Pi documentation or seek help from online forums.
Real-World Applications of Remote Pi Access
Now that you know how to access your Pi remotely for free, let’s explore some practical applications:
Home Automation
Use your Pi to control smart devices in your home, such as lights, thermostats, and security cameras. With remote access, you can manage your home automation system from anywhere in the world.
Remote Development
If you’re a developer, you can use your Pi as a remote development environment. Write and test code on your Pi without needing to be physically present.
File Sharing
Turn your Pi into a file server and access your files from any device. Whether you’re storing backups or sharing media, remote access makes it effortless.
Conclusion: Take Control of Your Pi Anywhere, Anytime
In conclusion, accessing your Pi remotely for free is not only possible but also incredibly rewarding. With the right tools and setup, you can unlock the full potential of your Raspberry Pi and take your projects to the next level.
So, what are you waiting for? Grab your Pi, follow the steps outlined in this guide, and start exploring the world of remote access. And don’t forget to share your experience in the comments below. Who knows? You might inspire others to join the Pi revolution!
Table of Contents
- Why Access Pi Remotely Free Matters in 2023
- Tools You Need to Access Pi Remotely Free
- Setting Up SSH for Free Remote Access
- Using Dynamic DNS for Remote Access
- Securing Your Remote Access
- Alternative Methods for Remote Access
- Troubleshooting Common Issues
- Real-World Applications of Remote Pi Access
- Conclusion