Ever wondered how to access your Raspberry Pi remotely even when it’s tucked behind a firewall? Well, you’re in the right place, buddy. In this guide, we’re diving deep into the world of remote SSH Raspberry Pi behind firewall on Ubuntu Server. Whether you’re a tech enthusiast or just trying to level up your home automation game, this article has got your back. So, grab a cup of coffee, sit back, and let’s unravel the secrets of remote access like a pro!
Imagine this: you’ve set up your Raspberry Pi as a powerful little server running Ubuntu, but now you want to access it from anywhere in the world. Sounds cool, right? But hold up—what if your network is protected by a firewall? Don’t sweat it. With a few clever tricks and some solid configuration, you can make remote SSH work like a charm.
This article isn’t just another boring tutorial. We’re going to break it down step by step, sprinkling in some real-world examples and practical tips along the way. By the end of this, you’ll have the skills to remotely manage your Pi without breaking a sweat. Let’s get started!
Read also:Trayvon Demarcus A Rising Star In The Spotlight
Before we jump into the nitty-gritty, here’s a quick table of contents to help you navigate through this guide:
- Introduction to Remote SSH
- Understanding Firewalls
- Raspberry Pi Setup
- Ubuntu Server Configuration
- Port Forwarding
- SSH Tunneling
- Dynamic DNS
- Security Best Practices
- Troubleshooting Tips
- Conclusion
Introduction to Remote SSH
SSH, or Secure Shell, is like the superhero of remote access tools. It allows you to securely connect to your Raspberry Pi from anywhere, as long as you’ve got an internet connection. But when you throw a firewall into the mix, things can get a little tricky. That’s where our guide comes in—to show you how to navigate those waters and keep your SSH connection rock-solid.
Remote SSH Raspberry Pi behind firewall on Ubuntu Server might sound intimidating, but with the right setup, it’s totally doable. Think of it as unlocking a secret door to your Pi, no matter where you are in the world. Now, let’s talk about why this is such a game-changer.
Why Remote SSH Matters
Whether you’re running a home server, managing IoT devices, or just tinkering with cool projects, remote SSH access gives you flexibility and control. You can monitor your Pi’s performance, update software, or troubleshoot issues without being physically present. And hey, who doesn’t love convenience?
Understanding Firewalls
Firewalls are like bouncers at a club—they decide who gets in and who stays out. In the context of networking, a firewall controls incoming and outgoing traffic based on predefined rules. While firewalls are crucial for security, they can sometimes block legitimate connections, like your SSH sessions.
When you’re trying to access your Raspberry Pi remotely, the firewall might block the connection unless you configure it properly. That’s why understanding how firewalls work is key to making remote SSH Raspberry Pi behind firewall on Ubuntu Server a success.
Read also:Ooh I Got Plenty Of Time Exploring The True Meaning And Its Impact On Life
Types of Firewalls
There are different types of firewalls, but the most common ones you’ll encounter are:
- Software firewalls: Installed on individual devices, like your Pi.
- Hardware firewalls: Built into routers or dedicated firewall appliances.
- Cloud-based firewalls: Managed through services like AWS or Azure.
Knowing which type of firewall you’re dealing with will help you tailor your configuration accordingly.
Raspberry Pi Setup
Alright, let’s talk about the star of the show—your trusty Raspberry Pi. Before you can set up remote SSH, you’ll need to make sure your Pi is properly configured. Here’s what you need to do:
Step 1: Install Ubuntu Server
First things first, you’ll want to install Ubuntu Server on your Raspberry Pi. This provides a solid foundation for running your SSH server. You can download the Ubuntu image from the official website and flash it onto your SD card using a tool like BalenaEtcher.
Step 2: Enable SSH
SSH comes pre-installed on Ubuntu Server, but you’ll need to enable it. You can do this by running the following command:
sudo systemctl enable ssh
And then start the SSH service:
sudo systemctl start ssh
Ubuntu Server Configuration
Now that your Pi is up and running, it’s time to configure the Ubuntu Server side of things. This involves tweaking some settings to make your SSH connection more secure and efficient.
Setting Up SSH Keys
Using SSH keys instead of passwords is a great way to enhance security. Here’s how you can generate a key pair:
ssh-keygen -t rsa -b 4096
Once you’ve generated the keys, copy the public key to your Pi:
ssh-copy-id pi@your-pi-ip
Configuring SSH Settings
You can customize your SSH settings by editing the SSH configuration file:
sudo nano /etc/ssh/sshd_config
Some important settings to consider are:
- Port: Change the default SSH port (22) to something less obvious.
- PasswordAuthentication: Set this to no to disable password-based login.
- PermitRootLogin: Set this to no to prevent root login.
Port Forwarding
Port forwarding is like creating a tunnel through your firewall to allow specific traffic to reach your Pi. Here’s how you can set it up:
Accessing Your Router
Log in to your router’s admin interface (usually via a web browser) and navigate to the port forwarding section. Add a new rule that maps an external port to your Pi’s internal IP address and SSH port.
For example, if your Pi’s IP is 192.168.1.100 and you’re using port 2222, the rule might look like this:
- External Port: 2222
- Internal IP: 192.168.1.100
- Internal Port: 22
SSH Tunneling
If port forwarding isn’t an option, SSH tunneling is another way to access your Pi remotely. This involves creating a secure connection between your local machine and your Pi through an intermediary server.
Setting Up a Jump Host
A jump host is a server that acts as a bridge between your local machine and your Pi. You can set one up by installing SSH on a cloud-based server and configuring your SSH client to use it as a proxy.
ssh -J user@jump-host pi@your-pi-ip
Dynamic DNS
If your internet service provider assigns a dynamic IP address, you’ll want to set up Dynamic DNS (DDNS) to keep track of changes. Services like No-IP or DuckDNS make this process a breeze.
Configuring DDNS
Sign up for a DDNS service and install their client on your Pi. This will ensure that your Pi’s hostname always points to the correct IP address, even if it changes.
Security Best Practices
Security should always be a top priority when setting up remote access. Here are some tips to keep your Pi safe:
Use Strong Passwords
Even if you’re using SSH keys, it’s a good idea to set a strong password for your Pi. Avoid using common words or easily guessable combinations.
Regularly Update Your System
Keep your Pi’s software up to date to protect against vulnerabilities. Run the following commands periodically:
sudo apt update && sudo apt upgrade
Monitor Logs
Check your SSH logs regularly for any suspicious activity. You can view them with:
sudo tail -f /var/log/auth.log
Troubleshooting Tips
Even with the best setup, things can sometimes go wrong. Here are a few troubleshooting tips to help you out:
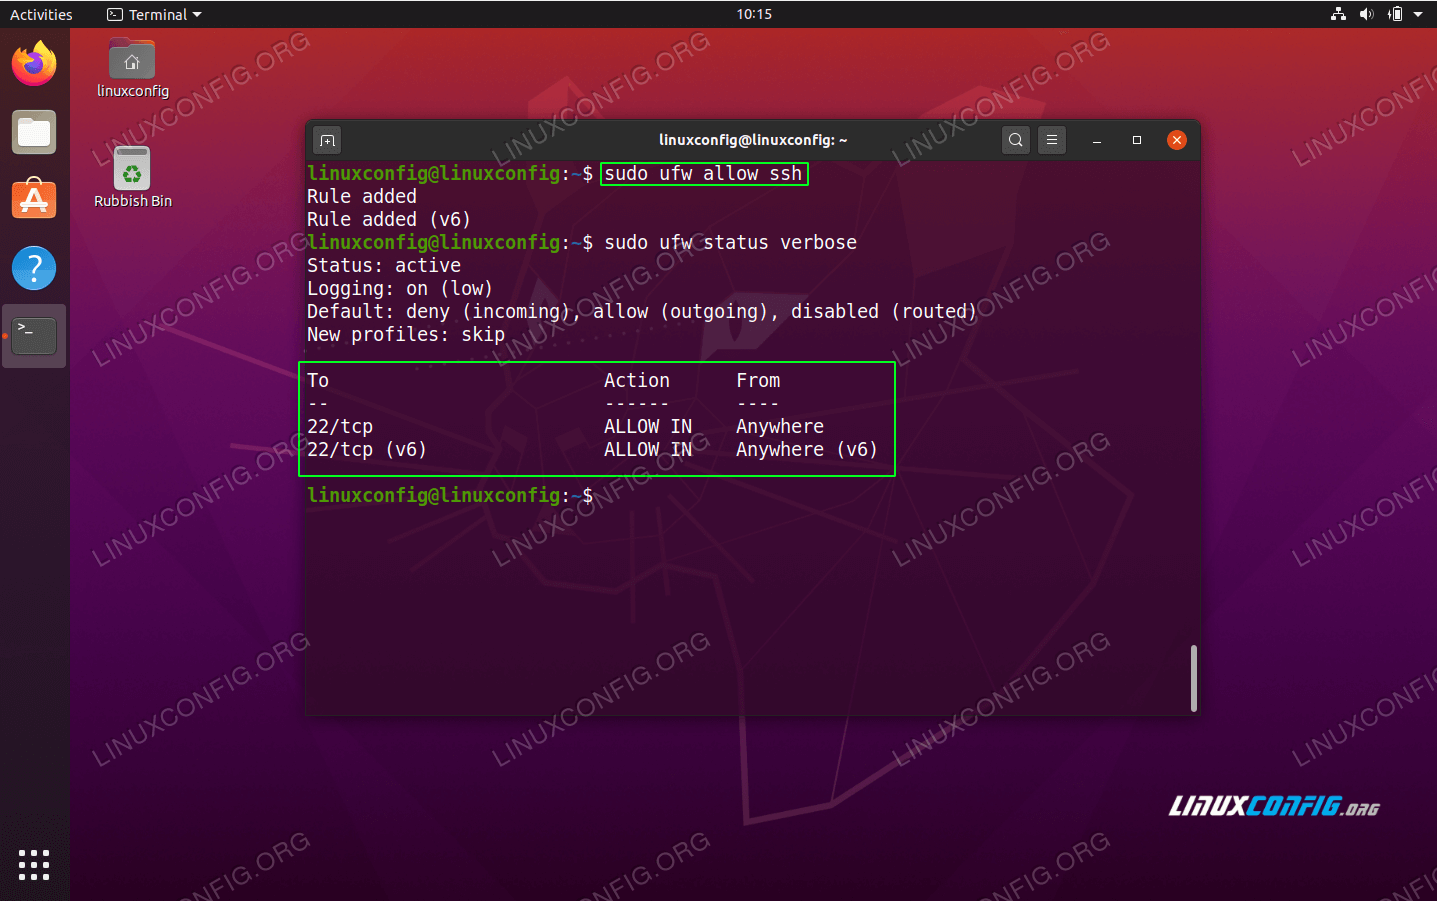
Check Firewall Rules
Make sure your firewall isn’t blocking the necessary ports. You can test this by temporarily disabling the firewall to see if the connection works.
Verify IP Address
Double-check that you’re using the correct IP address and port number. A small typo can cause big problems.
Test Locally First
Before attempting to connect remotely, make sure you can SSH into your Pi from within your local network. This will help you isolate any issues.
Conclusion
And there you have it—a comprehensive guide to remote SSH Raspberry Pi behind firewall on Ubuntu Server. By following these steps, you can unlock the full potential of your Pi and manage it from anywhere in the world. Remember, security is key, so always stay vigilant and keep your setup up to date.
Now it’s your turn! Try out these tips and let us know how it goes. If you have any questions or need further assistance, feel free to drop a comment below. And don’t forget to share this article with your tech-savvy friends. Happy hacking!