So, you’ve heard about Pi IoT VNC and how it can revolutionize the way you work with your Raspberry Pi, right? But let’s be real here, diving into this tech can feel overwhelming if you’re a beginner. Don’t sweat it, though. This Pi IoT VNC tutorial is your golden ticket to mastering remote access like a pro. Whether you’re tinkering with IoT projects or setting up your first Raspberry Pi, this guide has got your back.
Now, picture this: You’re at work, and suddenly you realize you forgot to tweak some settings on your Raspberry Pi project at home. Panic sets in, but wait—what if you could access your Pi remotely from anywhere? Enter Pi IoT VNC. This magical tool lets you control your Raspberry Pi as if you’re right there in front of it. And guess what? It’s easier than you think.
Before we dive deep, let’s get one thing straight: This isn’t just another tech tutorial. We’re breaking down the steps in a way that even your grandma could follow (no offense, Grandma). From setting up VNC on your Pi to troubleshooting common issues, we’ve got all the bases covered. So grab a coffee, sit back, and let’s get started.
Read also:Patricia Lelis Bolin The Rising Star In Entertainment
What is Pi IoT VNC and Why Should You Care?
Pi IoT VNC isn’t just a fancy term; it’s a game-changer for anyone working with IoT projects. At its core, VNC (Virtual Network Computing) allows you to remotely access and control your Raspberry Pi from another device. Whether you’re using a Windows PC, Mac, or even a smartphone, VNC gives you full control over your Pi without needing to be physically present.
For IoT enthusiasts, this means you can monitor and manage your projects from anywhere. Imagine being able to check on your home automation system while you’re on vacation or tweaking your weather station settings during a thunderstorm. Pi IoT VNC makes all of this possible, and trust me, once you start using it, you’ll wonder how you ever lived without it.
Key Benefits of Using VNC for IoT
- Remote access to your Raspberry Pi from anywhere
- Full control over your IoT projects without physical presence
- Compatibility with multiple devices and operating systems
- Cost-effective solution for managing multiple Pi devices
Getting Started: Setting Up VNC on Your Raspberry Pi
Alright, let’s get our hands dirty. Setting up VNC on your Raspberry Pi is surprisingly straightforward, but there are a few steps you need to follow. Don’t worry; I’ll walk you through each one so you don’t miss a beat.
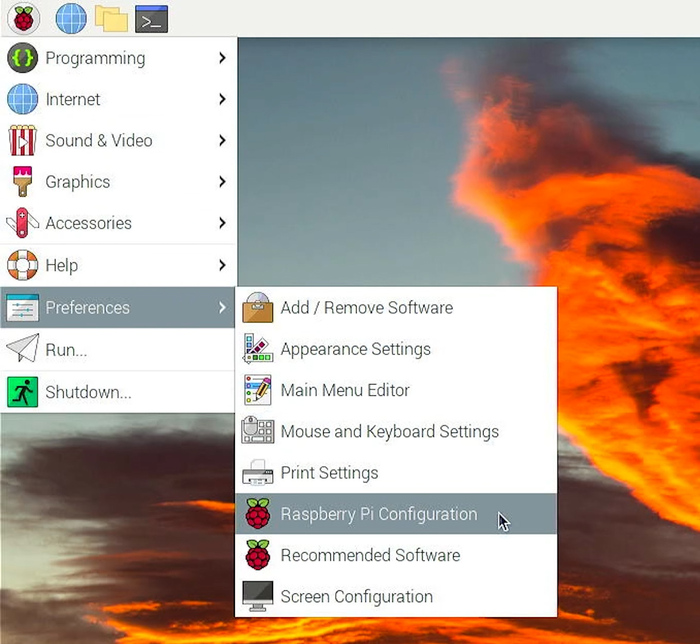
Step 1: Enable VNC on Your Raspberry Pi
First things first, you need to enable VNC on your Pi. Here’s how:
- Boot up your Raspberry Pi and open the terminal.
- Type
sudo raspi-configand hit Enter. - Navigate to Interfacing Options > VNC > Enable.
- Reboot your Pi by typing
sudo reboot.
And just like that, VNC is ready to roll on your Pi. Easy peasy, right?
Step 2: Install a VNC Viewer on Your Device
Now that VNC is enabled on your Pi, you’ll need a VNC Viewer on the device you plan to use for remote access. There are tons of options out there, but RealVNC Viewer is one of the most popular and reliable choices.
Read also:Discover The Hidden Gems Exploring Marshfield Beaches
Simply download and install RealVNC Viewer on your Windows, Mac, or Android/iOS device. Once installed, you’re ready to connect to your Pi.
Troubleshooting Common VNC Issues
Let’s face it, things don’t always go according to plan. If you run into issues while setting up VNC, here are a few troubleshooting tips to help you out:
- Connection Refused: Make sure VNC is enabled on your Pi and that your device is on the same network.
- Authentication Failed: Double-check your Pi’s username and password. It’s usually “pi” and “raspberry” by default, but you might have changed it.
- Slow Performance: Try lowering the screen resolution or disabling desktop effects for smoother performance.
If none of these work, don’t hesitate to hit up the Raspberry Pi forums or community. Chances are, someone’s already solved the issue you’re facing.
Exploring Advanced Features of Pi IoT VNC
Once you’ve got the basics down, it’s time to explore some of the advanced features VNC has to offer. From setting up unattended access to automating tasks, there’s a lot you can do to make your life easier.
Setting Up Unattended Access
Unattended access allows you to connect to your Pi without needing to manually log in each time. Here’s how to set it up:
- Open the VNC Server settings on your Pi.
- Go to the “Access Control” tab and enable unattended access.
- Set a secure password for added protection.
With unattended access, you can connect to your Pi at a moment’s notice without any hassle.
Automating Tasks with VNC
Automating repetitive tasks can save you tons of time and effort. Whether it’s running scripts or updating your IoT projects, VNC can help you streamline your workflow. Check out tools like Cron or Tasker to automate tasks on your Pi through VNC.
Security Best Practices for Pi IoT VNC
Security is always a top priority when it comes to remote access. Here are a few best practices to keep your Pi IoT VNC setup safe:
- Use strong, unique passwords for your Pi and VNC access.
- Enable encryption to protect your data during transmission.
- Regularly update your Pi’s software to patch security vulnerabilities.
By following these practices, you can enjoy the convenience of VNC without compromising your security.
Real-World Applications of Pi IoT VNC
So, how exactly can Pi IoT VNC be used in real-world scenarios? Here are a few examples:
- Home Automation: Monitor and control smart home devices from anywhere.
- Weather Stations: Collect and analyze weather data remotely.
- Remote Monitoring: Keep an eye on security cameras or industrial equipment.
The possibilities are endless, and with a little creativity, you can use Pi IoT VNC to solve real-world problems.
Future Trends in Pi IoT VNC
As technology continues to evolve, so does the world of Pi IoT VNC. Here are a few trends to watch out for:
- Cloud Integration: Expect more seamless integration with cloud services for enhanced functionality.
- AI-Powered Automation: AI-driven automation tools will make managing IoT projects easier than ever.
- Improved Security: Advances in encryption and authentication will make VNC even more secure.
Stay tuned for these exciting developments and keep pushing the boundaries of what’s possible with Pi IoT VNC.
Expert Tips for Mastering Pi IoT VNC
Here are a few expert tips to help you take your Pi IoT VNC skills to the next level:
- Experiment with different VNC viewers to find the one that suits your needs best.
- Keep your Pi’s software up to date to take advantage of the latest features and security patches.
- Document your setup process and configurations for future reference.
Remember, practice makes perfect. The more you experiment with Pi IoT VNC, the better you’ll get at it.
Conclusion: Unlocking the Power of Pi IoT VNC
And there you have it, folks—a comprehensive guide to mastering Pi IoT VNC. From setting up VNC on your Raspberry Pi to exploring advanced features and troubleshooting common issues, we’ve covered it all. Pi IoT VNC is a powerful tool that can transform the way you work with IoT projects, and with this tutorial, you’re well on your way to becoming a pro.
So, what are you waiting for? Dive in, experiment, and don’t be afraid to ask for help if you need it. And remember, the Pi community is full of friendly folks who are always willing to lend a hand. Happy tinkering!
Pro Tip: Don’t forget to share this tutorial with your friends and fellow Pi enthusiasts. The more the merrier, right? And if you have any questions or feedback, drop a comment below. We’d love to hear from you!
Table of Contents
- What is Pi IoT VNC and Why Should You Care?
- Getting Started: Setting Up VNC on Your Raspberry Pi
- Troubleshooting Common VNC Issues
- Exploring Advanced Features of Pi IoT VNC
- Security Best Practices for Pi IoT VNC
- Real-World Applications of Pi IoT VNC
- Future Trends in Pi IoT VNC
- Expert Tips for Mastering Pi IoT VNC
- Conclusion: Unlocking the Power of Pi IoT VNC