So, here's the deal—controlling your Raspberry Pi remotely is not just a cool trick; it’s a game-changer for anyone diving into the world of IoT, home automation, or even just tinkering with code. If you've ever wondered how to control your Raspberry Pi remotely, you're in the right place. This article will walk you step-by-step through the process, ensuring you don’t get lost in the maze of technical jargon. Let's dive in!
Think about it: what if you could manage your Raspberry Pi without being tethered to a keyboard and monitor? Sounds awesome, right? With remote access, you can monitor projects, troubleshoot issues, and even update your device from anywhere in the world. All you need is an internet connection and a bit of know-how. And guess what? We’re about to give you that know-how.
Before we get into the nitty-gritty, let me drop a quick fact: controlling your Raspberry Pi remotely is easier than you think. Whether you're a seasoned pro or a total noob, this guide will break down everything you need to know. So buckle up, because we’re about to take your Raspberry Pi game to the next level.
Read also:Mandisa And Simon Cowell A Deep Dive Into Their Collaboration Impact And Legacy
Why Should You Learn How to Control Your Raspberry Pi Remotely?
Alright, let’s talk about the "why." Why bother learning how to control your Raspberry Pi remotely when you can just hook it up to a monitor and keyboard? Well, here’s the thing: remote control opens up a whole new world of possibilities. Imagine being able to:
- Monitor your home security system from your phone while you're on vacation.
- Tweak your weather station settings without stepping outside.
- Access your media server or file storage from anywhere.
- Control your DIY smart home devices with ease.
These are just a few examples of what you can achieve. Plus, it’s just plain convenient. Who wants to lug around a monitor and keyboard when all you need is your laptop or smartphone?
Key Benefits of Remote Access
Let’s break down the benefits a bit further:
- Flexibility: Work on your projects from anywhere in the world.
- Cost-Effective: No need for additional hardware like monitors or keyboards.
- Efficiency: Save time by managing multiple devices remotely.
- Security: Monitor and control your systems even when you're not at home.
See? It’s not just about convenience—it’s about enhancing your Raspberry Pi experience. Now that we’ve established why remote control is so awesome, let’s move on to the how.
Step-by-Step Guide: How to Control Your Raspberry Pi Remotely
Ready to roll up your sleeves and get your hands dirty? Good. Here’s a step-by-step guide to help you set up remote access for your Raspberry Pi. We’ll cover everything from configuring your device to using remote desktop software. Let’s go!
Step 1: Enable SSH on Your Raspberry Pi
SSH, or Secure Shell, is the backbone of remote access. It allows you to connect to your Raspberry Pi from another device securely. Here’s how you enable it:
Read also:The Worst Army Mos A Comprehensive Analysis
- Boot up your Raspberry Pi and log in.
- Open the terminal and type
sudo raspi-config. - Use the arrow keys to navigate to "Interfacing Options" and hit Enter.
- Select "SSH" and enable it.
- Reboot your Raspberry Pi by typing
sudo reboot.
And just like that, SSH is ready to go. Easy peasy, right?
Step 2: Find Your Raspberry Pi’s IP Address
Now that SSH is enabled, you’ll need to find your Raspberry Pi’s IP address. This is the unique identifier that allows other devices to connect to it. Here’s how:
- Open the terminal on your Raspberry Pi.
- Type
hostname -Iand hit Enter. - Copy the IP address that appears (e.g., 192.168.1.10).
Keep this IP address handy—you’ll need it for the next steps.
Step 3: Connect to Your Raspberry Pi Using SSH
Now that SSH is enabled and you’ve got your IP address, it’s time to connect. Here’s how:
- On your laptop or desktop, open the terminal (Mac/Linux) or PuTTY (Windows).
- Type
ssh pi@[your_pi_ip_address]and hit Enter. - Enter your Raspberry Pi’s password when prompted.
Boom! You’re now connected to your Raspberry Pi remotely via SSH.
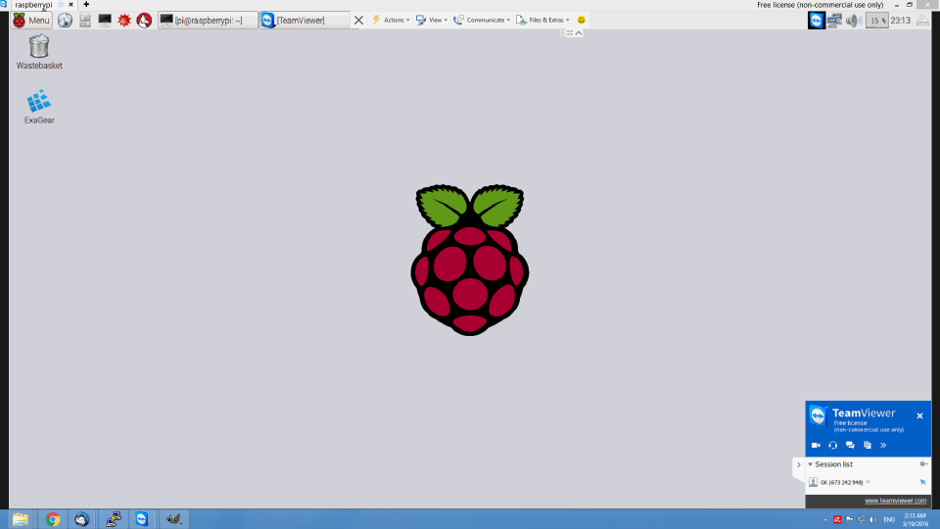
Alternative Methods: VNC for Remote Desktop Access
While SSH is great for command-line tasks, what if you want full desktop access? That’s where VNC comes in. VNC allows you to control your Raspberry Pi’s graphical interface remotely. Here’s how to set it up:
Step 1: Install VNC Server on Your Raspberry Pi
First, you’ll need to install the VNC server on your Raspberry Pi:
- Open the terminal and type
sudo apt update. - Then, type
sudo apt install realvnc-vnc-server realvnc-vnc-viewer. - Reboot your Raspberry Pi with
sudo reboot.
That’s it—VNC server is now installed.
Step 2: Enable VNC on Your Raspberry Pi
Next, you’ll need to enable VNC:
- Open the Raspberry Pi Configuration tool by typing
sudo raspi-config. - Go to "Interfacing Options" and select "VNC."
- Enable VNC and exit the tool.
Your Raspberry Pi is now ready for remote desktop access.
Step 3: Connect to Your Raspberry Pi Using VNC Viewer
Finally, connect to your Raspberry Pi from another device:
- Download and install VNC Viewer on your laptop or smartphone.
- Enter your Raspberry Pi’s IP address and connect.
- Log in with your Raspberry Pi credentials.
Voilà! You now have full desktop access to your Raspberry Pi.
Tips and Tricks for Remote Access
Now that you’ve got the basics down, here are a few tips and tricks to make your remote access experience smoother:
Tip 1: Use a Static IP Address
By default, your Raspberry Pi’s IP address may change whenever it reconnects to the network. To avoid this, set a static IP address:
- Open the terminal and type
sudo nano /etc/dhcpcd.conf. - Add the following lines at the bottom:
interface eth0orinterface wlan0(depending on your connection).static ip_address=192.168.1.[your_preferred_ip].static routers=192.168.1.1.static domain_name_servers=192.168.1.1.- Save and exit by pressing Ctrl+X, Y, Enter.
- Reboot your Raspberry Pi.
Now your Raspberry Pi will always have the same IP address.
Tip 2: Secure Your Connection
Security is key when it comes to remote access. Here are a few ways to keep your Raspberry Pi safe:
- Change the default password for the "pi" user.
- Enable two-factor authentication for SSH.
- Use a firewall to block unauthorized access.
These simple steps can go a long way in protecting your device.
Common Issues and How to Fix Them
Even the best-laid plans can hit a snag. Here are some common issues you might encounter and how to fix them:
Issue 1: Unable to Connect via SSH
If you’re having trouble connecting via SSH, here’s what to check:
- Make sure SSH is enabled on your Raspberry Pi.
- Double-check the IP address you’re using.
- Ensure your network allows SSH connections.
If all else fails, try restarting your Raspberry Pi and router.
Issue 2: Slow Remote Desktop Performance
Remote desktop access can sometimes be sluggish. Here’s how to speed it up:
- Use a wired connection instead of Wi-Fi.
- Lower the screen resolution in VNC settings.
- Close unnecessary programs on your Raspberry Pi.
These tweaks should help improve performance.
Data and Statistics: The Growing Importance of Remote Access
According to a recent study by IoT Analytics, the number of connected devices worldwide is expected to reach 27 billion by 2025. With more and more people relying on IoT devices, the ability to control them remotely is becoming increasingly important.
Another report by Statista found that 60% of businesses use remote access tools to manage their IT infrastructure. This trend is not limited to businesses—individuals are also embracing remote access for personal projects and automation.
These numbers highlight the growing demand for remote access solutions, making it an essential skill for anyone working with Raspberry Pi or similar devices.
Conclusion: Take Control of Your Raspberry Pi
And there you have it—everything you need to know about how to control your Raspberry Pi remotely. From enabling SSH to setting up VNC, we’ve covered all the bases. Remember, remote access is not just a convenience; it’s a necessity in today’s connected world.
So, what are you waiting for? Grab your Raspberry Pi and start exploring the possibilities. And don’t forget to share your experiences in the comments below. Who knows? You might just inspire someone else to take their Raspberry Pi journey to the next level.
Until next time, keep coding, keep creating, and keep exploring. The world of technology is yours for the taking!
Table of Contents
- Why Should You Learn How to Control Your Raspberry Pi Remotely?
- Step-by-Step Guide: How to Control Your Raspberry Pi Remotely
- Alternative Methods: VNC for Remote Desktop Access
- Tips and Tricks for Remote Access
- Common Issues and How to Fix Them
- Data and Statistics: The Growing Importance of Remote Access
- Conclusion: Take Control of Your Raspberry Pi