So, you're looking to remotely access Raspberry Pi remote desktop on Windows 10? Cool! Let me tell you something—this is a game-changer for anyone who loves tinkering with tech or just wants to get more out of their Raspberry Pi setup. Whether you're a hobbyist, developer, or just someone curious about remote desktops, this guide is for you. Trust me, by the end of it, you'll feel like a pro!
Accessing your Raspberry Pi remotely can save you tons of time and effort. Imagine being able to control your tiny little computer from anywhere in the house—or even from across the globe! Sounds pretty sweet, right? But before we dive into the nitty-gritty, let’s break down why this setup is so awesome. It’s not just about convenience; it’s also about flexibility and efficiency.
Now, if you’re new to all this, don’t worry. We’ll go step-by-step, ensuring that even beginners can follow along without breaking a sweat. By the time you finish reading, you’ll have a solid understanding of how to remotely access Raspberry Pi remote desktop on Windows 10 and troubleshoot any issues that might pop up along the way. Ready? Let’s roll!
Read also:Cristina Carmella Booty The Ultimate Guide To Her Career Achievements And Impact
Table of Contents
- Introduction to Raspberry Pi Remote Access
- Preparing Your Raspberry Pi
- Setting Up Windows 10 for Remote Access
- Using RDP to Connect
- Alternative Option: VNC Viewer
- SSH for Command-Line Access
- Firewall and Network Configurations
- Troubleshooting Common Issues
- Security Tips for Remote Connections
- Wrapping It Up
Introduction to Raspberry Pi Remote Access
Alright, first things first—what exactly does “remotely access Raspberry Pi remote desktop on Windows 10” mean? Simply put, it means controlling your Raspberry Pi from your Windows PC without needing to physically sit in front of the device. This is super useful if you want to manage servers, run scripts, or even just stream media files.
There are several methods to achieve this, but the most popular ones include using Remote Desktop Protocol (RDP), Virtual Network Computing (VNC), or Secure Shell (SSH). Each method has its own advantages, so we’ll explore them all. Let’s start with preparing your Raspberry Pi because, hey, you can’t connect to something that isn’t ready, right?
Preparing Your Raspberry Pi
Step 1: Update Your Raspberry Pi OS
Before doing anything else, make sure your Raspberry Pi is running the latest version of Raspberry Pi OS. You don’t want outdated software messing up your setup. Open a terminal on your Pi and run these commands:
sudo apt update && sudo apt upgrade
These commands will fetch updates and upgrade your system packages. Give it a few minutes, grab a coffee, and come back when it’s done.
Read also:Anna Ellison A Rising Star In The Entertainment Industry
Step 2: Enable Remote Desktop
Next, you’ll need to enable the remote desktop feature on your Raspberry Pi. Here’s how:
- Go to the Raspberry Pi main menu.
- Select Preferences > Raspberry Pi Configuration.
- Click on the Interfaces tab.
- Under Remote Access, select Enable next to VNC and SSH.
That’s it! Your Raspberry Pi is now set up to allow remote connections. Easy peasy, right?
Setting Up Windows 10 for Remote Access
Now let’s switch gears and focus on your Windows 10 machine. To remotely access Raspberry Pi remote desktop on Windows 10, you’ll need to install a few tools. Don’t panic—it’s not as complicated as it sounds.
Option 1: Using Built-In RDP
Windows 10 comes with a built-in Remote Desktop Client, which works perfectly for connecting to Raspberry Pi. Just follow these steps:
- Press the Windows key and search for “Remote Desktop Connection.”
- Click on the app to open it.
- In the Computer field, enter the IP address of your Raspberry Pi.
- Click Connect, and voilà—you’re in!
If you’re unsure about your Raspberry Pi’s IP address, you can find it by running ifconfig in the terminal or checking your router settings.
Option 2: Third-Party Tools
While the built-in RDP works fine, some users prefer third-party tools like RealVNC or TeamViewer. These apps offer additional features and better performance, especially over slower networks.
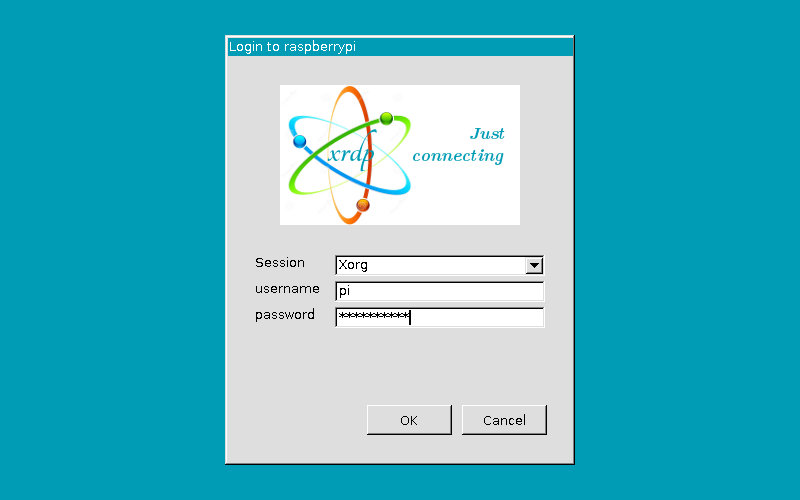
Using RDP to Connect
Let’s talk about RDP in more detail. Remote Desktop Protocol is one of the easiest ways to remotely access Raspberry Pi remote desktop on Windows 10. It’s fast, reliable, and requires minimal setup. Here’s what you need to do:
- Ensure your Raspberry Pi is configured to accept RDP connections.
- Install an RDP client on your Windows PC if you’re not using the built-in one.
- Enter the correct IP address and credentials to establish the connection.
Remember, security is key here. Always use strong passwords and avoid exposing your Raspberry Pi to public networks unless absolutely necessary.
Alternative Option: VNC Viewer
If RDP isn’t your cup of tea, VNC Viewer is another excellent option. It’s a bit more versatile and offers better support for graphical interfaces. Plus, it’s free for personal use.
How to Set Up VNC Viewer
Here’s a quick rundown:
- Download and install VNC Viewer on your Windows PC.
- On your Raspberry Pi, ensure VNC Server is installed and running.
- Enter the Pi’s IP address in VNC Viewer and log in with your credentials.
Simple, right? VNC Viewer is a great choice if you need more control over your Raspberry Pi’s desktop environment.
SSH for Command-Line Access
For those who prefer the command line, SSH is the way to go. It’s lightweight, secure, and perfect for scripting tasks. Here’s how to set it up:
- Enable SSH on your Raspberry Pi (we covered this earlier).
- Install an SSH client on your Windows PC, such as PuTTY or Windows Terminal.
- Connect to your Pi using its IP address and login details.
SSH might not give you a graphical interface, but it’s lightning-fast and ideal for automating processes.
Firewall and Network Configurations
One common issue people face when trying to remotely access Raspberry Pi remote desktop on Windows 10 is firewall interference. Make sure both your Raspberry Pi and Windows PC have the necessary ports open. For RDP, it’s usually port 3389, while VNC uses port 5900.
Configuring Your Router
If you’re accessing your Raspberry Pi from outside your local network, you’ll need to configure port forwarding on your router. This allows external devices to connect to your Pi. Be cautious, though—exposing your Pi to the internet can pose security risks if not done properly.
Troubleshooting Common Issues
Even with the best preparation, things can sometimes go wrong. Here are a few common issues and their solutions:
- Can’t connect to Raspberry Pi: Double-check the IP address and ensure the Pi is powered on and connected to the network.
- Authentication failed: Verify that you’re using the correct username and password.
- Slow connection: Try optimizing your network settings or switch to a wired connection for better performance.
If none of these work, feel free to leave a comment below, and I’ll do my best to help you out!
Security Tips for Remote Connections
Security should always be a top priority when setting up remote access. Here are a few tips to keep your Raspberry Pi safe:
- Use strong, unique passwords for all accounts.
- Enable two-factor authentication if supported by your chosen method.
- Regularly update your Raspberry Pi OS and installed software.
- Limit access to trusted IP addresses whenever possible.
By following these best practices, you’ll significantly reduce the risk of unauthorized access.
Wrapping It Up
And there you have it—a comprehensive guide on how to remotely access Raspberry Pi remote desktop on Windows 10. Whether you choose RDP, VNC, or SSH, each method has its own strengths and weaknesses. The key is to pick the one that best suits your needs and skill level.
Remember, practice makes perfect. Don’t be afraid to experiment and tweak your setup until you’re happy with the results. And most importantly, stay secure while exploring the world of remote computing!
Got any questions or feedback? Drop a comment below, and let’s chat. Who knows? Maybe we’ll turn you into a Raspberry Pi guru in no time!